Bike Fitting Guide: How Proper Position Prevents Injury and Improves Power
Ever finish a long ride feeling like you’ve been hit by a truck? Aching knees, numb hands, a lower back that screams with every pedal stroke? Chances are, your bike isn’t fitted to your body—and that’s costing you both comfort and watts. A proper bike fitting guide isn’t just for pros chasing marginal gains; it’s essential for anyone who wants to ride pain-free and unlock their true potential on the bike. Whether you’re dealing with persistent discomfort or simply want to squeeze more speed from your legs, understanding proper bike setup is the single most important investment you can make in your cycling journey.
Why Bike Fit Matters: The Foundation of Cycling Performance
Think of your bike fit as the foundation of a house. Build on shaky ground, and everything above it suffers. Poor cycling biomechanics don’t just make you uncomfortable—they actively cause injury and drain your power before it even reaches the pedals. Studies suggest that up to 85% of cyclists experience some form of overuse injury, with knee pain being the most common complaint. The culprit? Usually incorrect saddle height or poor cleat position.
When your cycling position is dialed in, magic happens. Your muscles fire in the right sequence, your joints track properly through their range of motion, and you can sustain higher power output optimization without burning out. A properly fitted bike can improve your efficiency by 5-10%, which translates to significantly faster times or simply more enjoyable rides. Beyond performance, correct proper bike setup prevents the trifecta of cycling misery: knee pain from improper tracking, lower back pain from excessive reach or saddle tilt, and hand numbness from too much weight on your palms.
The difference between a professional bike fit and DIY adjustments comes down to precision and technology. Professionals use motion capture, pressure mapping, and years of experience to dial in measurements down to the millimeter. But for most recreational riders, understanding basic bicycle fitting principles and making thoughtful adjustments at home can solve 80% of comfort issues—and that’s exactly what this bike fitting guide will help you achieve.

Essential Bike Fitting Adjustments: A Step-by-Step Guide
Ready to transform your ride? These fundamental adjustments form the core of any bike fitting guide and address the most common sources of discomfort and inefficiency. Grab your Allen keys and let’s get to work on how to fit a bike properly.
Saddle Height and Fore-Aft Position
Saddle height adjustment is arguably the most critical element of cycling position. Get this wrong, and you’ll either hyperextend your knee at the bottom of the stroke (saddle too high) or never fully engage your glutes and hamstrings (saddle too low). Here’s how to adjust saddle height correctly: Start with the heel-to-pedal method. Sit on your saddle with your heel on the pedal at its lowest point (6 o’clock position). Your leg should be completely straight with no knee bend. When you move your foot to the proper pedaling position (ball of foot over pedal spindle), you’ll have the ideal 25-35 degree knee bend.
For a more precise calculation, try the 0.883 formula: Measure your inseam in centimeters (stand barefoot against a wall with a book between your legs, measuring from floor to book top), then multiply by 0.883. This gives you the distance from the center of your bottom bracket to the top of your saddle. Signs you’ve got it wrong? If your hips rock side to side while pedaling, your saddle is too high. If your knee remains excessively bent at the bottom of the stroke, it’s too low—a common cause of bike fitting to prevent knee pain.
For saddle setback, use the Knee Over Pedal Spindle (KOPS) method as a starting point. With pedals level (3 and 9 o’clock), drop a plumb line from the bony protrusion just below your kneecap. It should fall roughly over the pedal spindle. This neutral position works for most riders, though time trialists might move forward for power, while mountain bikers often sit further back for stability on descents. This adjustment dramatically affects knee alignment cycling and can make or break your comfort.

Handlebar Height, Reach, and Cleat Positioning
Handlebar reach determines how stretched out you are on the bike—crucial for both comfort and aerodynamics. In bike geometry terms, we talk about stack and reach: stack is the vertical distance from bottom bracket to the top of the head tube, while reach is the horizontal distance. For a road bike fitting guide step by step approach, start with your stem length. When your hands are on the hoods, you should have a slight bend in your elbows (never locked straight). Your torso should be at roughly 45 degrees for an aggressive road position, or more upright (60+ degrees) for comfort-oriented riding.
If you lack flexibility or have back issues, a shorter stem or higher spacers under your stem can bring the bars closer and higher. This sacrifices some aerodynamics but dramatically improves cycling ergonomics. Remember: the best bike position for power output is one you can actually sustain for your entire ride. Discomfort forces you to shift positions constantly, disrupting your pedal stroke and wasting energy.
Cleat position is often overlooked but critical for pedaling efficiency and avoiding hot spots or knee pain. Position the cleat so the ball of your foot (the widest part) sits directly over the pedal spindle. Too far forward creates calf strain and hot spots; too far back reduces power transfer. For fore-aft cleat placement, most riders benefit from a neutral position, though some prefer moving the cleat slightly back to reduce calf loading on long rides. This is a key element of cycling position to avoid injury, particularly for riders experiencing Achilles or plantar fascia issues.

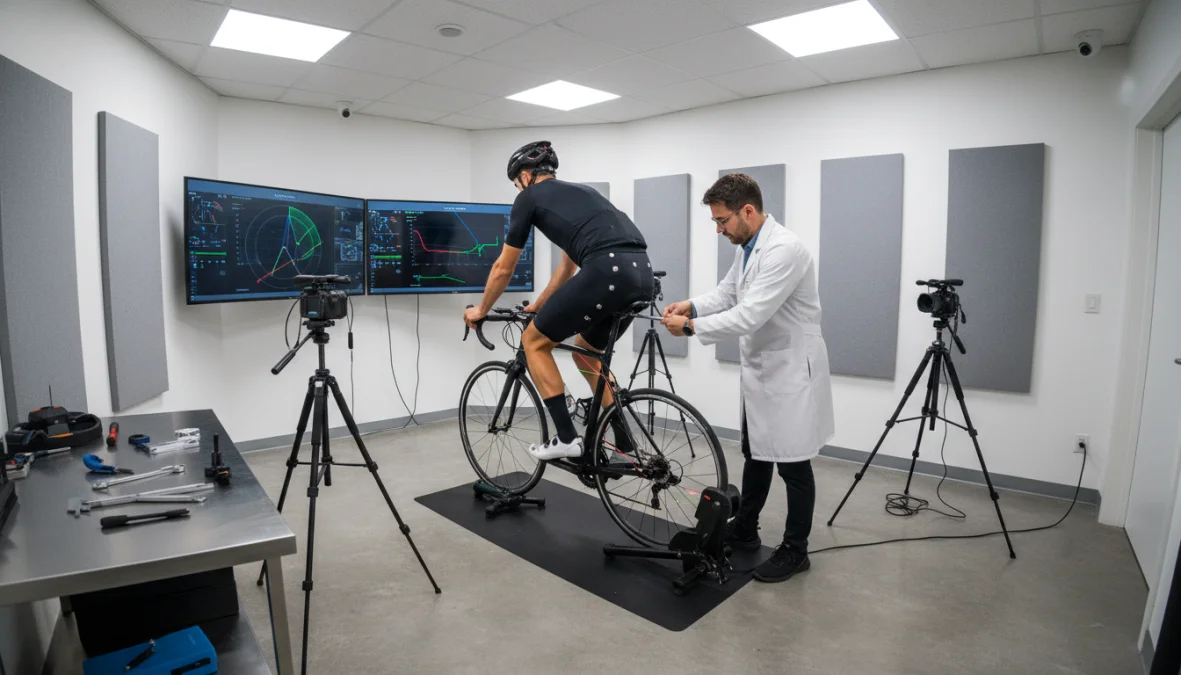
When to Get a Professional Bike Fit vs DIY Adjustments
So when should you invest in a professional bike fit versus tackling diy bike fitting at home? If you’re experiencing persistent pain despite making basic adjustments, it’s time to see a pro. Similarly, if you’ve just purchased a new bike (especially if it’s your first road bike or you’re switching disciplines), a professional fitting session ensures you start with a solid foundation rather than developing bad habits or compensatory patterns.
A comprehensive bike fit session typically costs between $150-400 and includes video analysis of your pedal stroke, assessment of flexibility and any biomechanical limitations, and precise measurements using tools like laser alignment systems or pressure mapping saddles. You’ll walk away with documented measurements and often specific recommendations for equipment changes—different saddles, stem lengths, or even shoe inserts. Serious cyclists who race or log serious mileage will see this investment pay dividends in performance and injury prevention.
On the flip side, bike fitting for beginners can absolutely start at home. The adjustments covered in this guide—saddle height, basic fore-aft position, and handlebar reach—solve the majority of comfort issues for recreational riders. Tools like smartphone apps with angle measurements, online fit calculators, and simple plumb lines get you 90% of the way there. Keep detailed notes of your measurements so you can track changes and revert if an adjustment doesn’t work out.
Red flags that signal you need professional help: pain that persists despite adjustments, numbness that doesn’t resolve within minutes of getting off the bike, significant differences in power between legs, or if you’re recovering from an injury. Professional fitters can identify issues like leg length discrepancies, limited hip flexibility, or previous injuries that affect your optimal position—factors that simple bicycle fitting formulas can’t account for.
Your body and bike should work as one seamless unit, not two parts fighting each other. Whether you invest in a professional bike fit or spend an afternoon carefully working through this bike fitting guide, the result is the same: more power to the pedals, fewer aches after rides, and the pure joy of cycling the way it’s meant to feel. Start with these fundamentals, listen to your body, and make small adjustments over time. Your knees, back, and personal records will thank you for it. Now get out there and find your perfect position—the roads are waiting.