Cycling Power Meter Guide: How to Train Smarter with Watts and Power Data
You’ve probably heard fellow cyclists talking about watts, FTP tests, and power zones like they’re speaking a secret language. Well, it’s time to crack the code. Training with a power meter isn’t reserved for pros anymore—it’s one of the most transformative tools any cyclist can use to ride faster, train smarter, and finally understand what’s actually happening beneath those pedal strokes. This cycling power meter guide will walk you through everything you need to know, from choosing the right device to putting those watts to work in your training.
What Is a Power Meter and Why Cyclists Use Them
A power meter cycling device measures the actual force you’re applying to the pedals, expressed in watts. Unlike a heart rate monitor that shows your body’s response to effort, or a cadence sensor that simply counts pedal revolutions, a power meter tells you exactly how much work you’re doing in real-time. Think of it as the difference between guessing how hard you’re working versus having precise, objective numbers.
Cycling watts explained: When you push down on the pedals, you create torque. Multiply that torque by your cadence, and you get power output in watts. Simple physics, powerful results.
The power meter benefits are substantial:
- Objective data: No more guessing whether you’re pushing hard enough or overtraining
- Precise pacing: Perfect your effort distribution in races and long rides
- Measurable progress: Track fitness improvements with concrete numbers
- Better intervals: Hit exact training zones regardless of terrain, weather, or fatigue
- Consistency: Power doesn’t lie—unlike heart rate training, which can be affected by sleep, caffeine, stress, and temperature
Whether you’re an amateur looking to improve or a competitive rider chasing marginal gains, power data provides the roadmap to get there faster.
Types of Power Meters and How to Choose the Right One
Understanding power meter types is crucial when figuring out how to choose a cycling power meter. Each design has distinct advantages depending on your budget, bike setup, and accuracy needs.
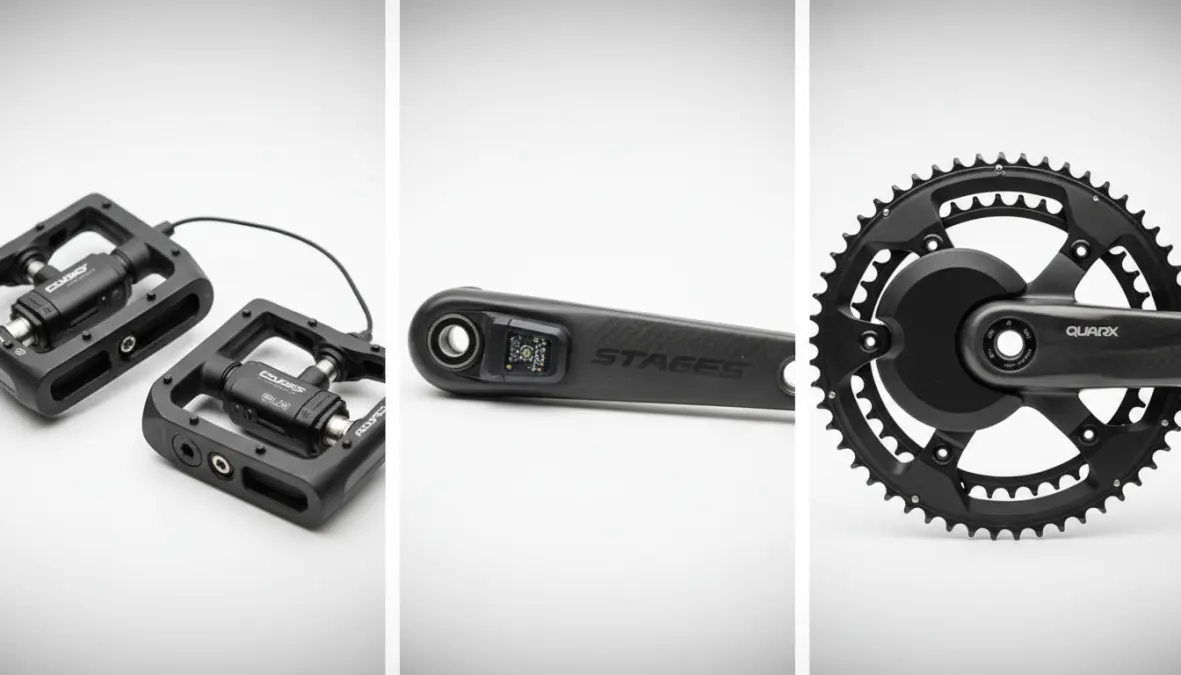
Pedal-based power meter: Installed in the pedals themselves, these are incredibly portable and easy to swap between bikes. Brands like Garmin Vector and Favero Assioma dominate this category. They offer dual-sided measurement (capturing power from both legs independently) and simple installation—just screw them on. The downside? They’re typically the most expensive option and may have compatibility issues with certain cleat systems.
Crank arm power meter: These attach to one or both crank arms. Single-sided versions (like Stages) measure one leg and double the reading, while dual-sided options capture true left-right balance. They’re generally more affordable than pedal-based systems and work with most bikes. However, installation requires some mechanical know-how, and you’ll need to ensure compatibility with your crankset.
Spider-based (chainring) power meters: Mounted between the crank arms and chainrings, these are highly accurate and protected from the elements. They’re popular among serious racers but require specific crankset compatibility and professional installation.
Hub-based power meters: Built into the rear wheel hub, these are well-protected and accurate but the least portable—you’re locked to one wheelset unless you want to transfer the hub (which defeats the purpose).
Key factors when choosing the best cycling power meter for you:
- Budget: Expect to spend €300-€1,200+ depending on type and features
- Bike compatibility: Check if your current components work with the power meter
- Accuracy: Most quality meters are within ±2%, which is more than adequate
- Single vs. dual-sided: Dual-sided reveals leg imbalances but costs more
- Portability: Pedal-based wins if you swap between bikes frequently
For beginners, a single-sided crank arm or pedal-based system offers the best balance of cost and functionality. Don’t overthink it—are power meters worth it for cycling? Absolutely, and even an entry-level model beats having none at all.

Training with Power: FTP, Zones, and How to Use Your Data
Once you’ve got your power meter installed, it’s time to put it to work. Training with power revolves around understanding your capabilities and structuring workouts around specific intensity zones.
Understanding FTP and Power Zones
FTP cycling—or functional threshold power—is the maximum average power you can sustain for approximately one hour. It’s the cornerstone of power-based training, serving as your baseline for calculating training zones.
How to calculate FTP cycling: The most common test is the 20-minute FTP test. After a proper warm-up, ride as hard as you can sustain for 20 minutes on a relatively flat course or trainer. Take 95% of your average power for those 20 minutes—that’s your FTP. For example, if you average 250 watts, your FTP is approximately 237 watts.
Once you know your FTP, you can establish power zones cycling:
- Zone 1 (Active Recovery): <55% FTP – Easy spinning
- Zone 2 (Endurance): 56-75% FTP – Base building, long rides
- Zone 3 (Tempo): 76-90% FTP – Sustained aerobic efforts
- Zone 4 (Threshold): 91-105% FTP – The “sweet spot” for raising FTP
- Zone 5 (VO2 Max): 106-120% FTP – Hard intervals
- Zone 6 (Anaerobic): 121-150% FTP – Very short, intense efforts
- Zone 7 (Neuromuscular): >150% FTP – Sprints
These zones guide every training session, ensuring you’re hitting the right physiological adaptations. For more comprehensive fitness building, check out our spring cycling training guide.
Practical Training Applications
How to train with a power meter in real-world scenarios goes beyond just watching numbers. Here’s where power data truly shines:
Structured interval training: Instead of “going hard” based on feel, you can execute precise workouts like 3×10 minutes at Zone 4 (sweet spot training) with 5-minute recoveries. Power ensures you’re not going too easy or blowing up halfway through.
Race and climb pacing: Power prevents the classic mistake of starting too hard. On a long climb, you can maintain steady watts rather than getting caught up in heart rate lag or adrenaline. What is a good wattage for cycling? It depends on your power to weight ratio—a 70kg rider holding 280 watts (4 w/kg) up a climb is performing very well.
Monitoring fatigue: Normalized power (NP) accounts for variability in your effort, giving a better picture of the true physiological cost than average power. A ride with lots of surges might show 200W average but 240W normalized—that’s the real stress your body experienced. Pair this with training stress score (TSS) to track cumulative fatigue and recovery needs over weeks.
Complement your power training with proper positioning—our bike fitting guide helps ensure you’re biomechanically optimized to produce maximum power efficiently. Also consider strength training for cyclists to build the muscular foundation that translates to more watts on the bike.
FAQ
What is a good wattage for cycling?
It depends entirely on your body weight and experience level. Recreational riders might average 150-200 watts, while competitive amateurs often sustain 250-300 watts. What matters more is your power-to-weight ratio: 2-3 w/kg is recreational, 3-4 w/kg is competitive amateur, and 4+ w/kg enters elite territory. Focus on improving your own numbers rather than comparing absolute watts.
Do I need a power meter as a beginner?
While not essential when you’re just starting out, a power meter accelerates your learning curve dramatically. It teaches you pacing, helps avoid overtraining, and provides clear progression markers. If you’re serious about improvement and can afford one, it’s one of the best investments you’ll make. Start simple with an entry-level model—the data is what matters, not fancy features.
How accurate are cycling power meters?
Most quality power meters claim accuracy within ±1-2%, which is more than sufficient for training purposes. What’s more important than absolute accuracy is consistency—the same meter giving you repeatable readings. Even if your meter reads slightly high or low, the relative changes in your fitness will still show clearly. Dual-sided systems tend to be most accurate, but single-sided options work perfectly fine for training.
What’s the difference between average and normalized power?
Average power is simply the arithmetic mean of your entire ride. Normalized power (NP) is a weighted average that accounts for the variable nature of cycling effort—it weights harder efforts more heavily because they’re more physiologically demanding. A ride with constant 200W effort shows both average and NP at 200W. But a ride with surges might average 200W yet have 230W NP—reflecting the true cost to your body.
Ready to unlock your true potential on the bike? A power meter transforms guesswork into precision, feelings into data, and aspirations into measurable progress. Whether you’re chasing podiums or personal records, understanding and applying these principles will make you a smarter, faster, stronger cyclist. The watts don’t lie—now get out there and start producing them.