Resistance Band Workouts for Cyclists: Complete Portable Strength Training Guide

Let’s face it—most cyclists don’t exactly get excited about hitting the gym. Between work, family, and logging miles on the bike, who has time for a full strength session? But here’s the thing: resistance band cyclists have discovered a game-changing secret. These simple, portable tools can transform your cycling power, prevent injuries, and fit into even the busiest training schedule. No gym membership required, no heavy equipment to lug around—just you, a few colorful bands, and 20 minutes of focused work that’ll make you stronger on every pedal stroke.
Why Resistance Bands Are Perfect for Cyclist Strength Training
When it comes to cyclist strength training, resistance bands check all the boxes that matter. Unlike traditional weights that primarily work with gravity, resistance bands for cycling provide constant tension throughout the entire range of motion—exactly what your muscles experience during the repetitive cycling motion. This makes them incredibly effective for building the specific strength patterns you need on the bike.
The portable workout bands advantage is huge for cyclists who travel to races, training camps, or cycling events. A set of bands weighs practically nothing and fits in your jersey pocket. You can maintain your strength routine in hotel rooms, at Airbnbs, or even at the race venue. No more skipping crucial strength sessions because you’re away from your home gym.
But portability isn’t the only benefit. Resistance bands excel at targeting the specific muscles that power your pedal stroke—glutes, quads, hip flexors, and core stabilizers. They’re also gentler on joints than heavy weights, which means you can strengthen key areas without the recovery demands that might interfere with your riding schedule. This is critical for avoiding overtraining symptoms while still building the strength you need.
Research shows that targeted resistance training can improve cycling power output by 8-12% without adding bulk. Bands allow you to progressively overload muscles in functional movement patterns that directly translate to better pedaling efficiency and increased force production on climbs. Plus, they’re perfect for injury prevention—strengthening hip stabilizers and glutes helps prevent common cycling issues like knee pain and IT band syndrome.
Essential Resistance Band Exercises for Cycling Performance
These cycling resistance exercises represent the best resistance band exercises for cyclists, carefully selected to address the specific demands of riding. Each movement targets key weaknesses while building functional fitness that translates directly to the bike. Let’s break them down by muscle group focus.
Lower Body Power Exercises
Your legs generate the watts, so leg strength training forms the foundation of any cyclist’s resistance program. These band training cyclists exercises build the explosive power needed for sprints, climbs, and sustained efforts.
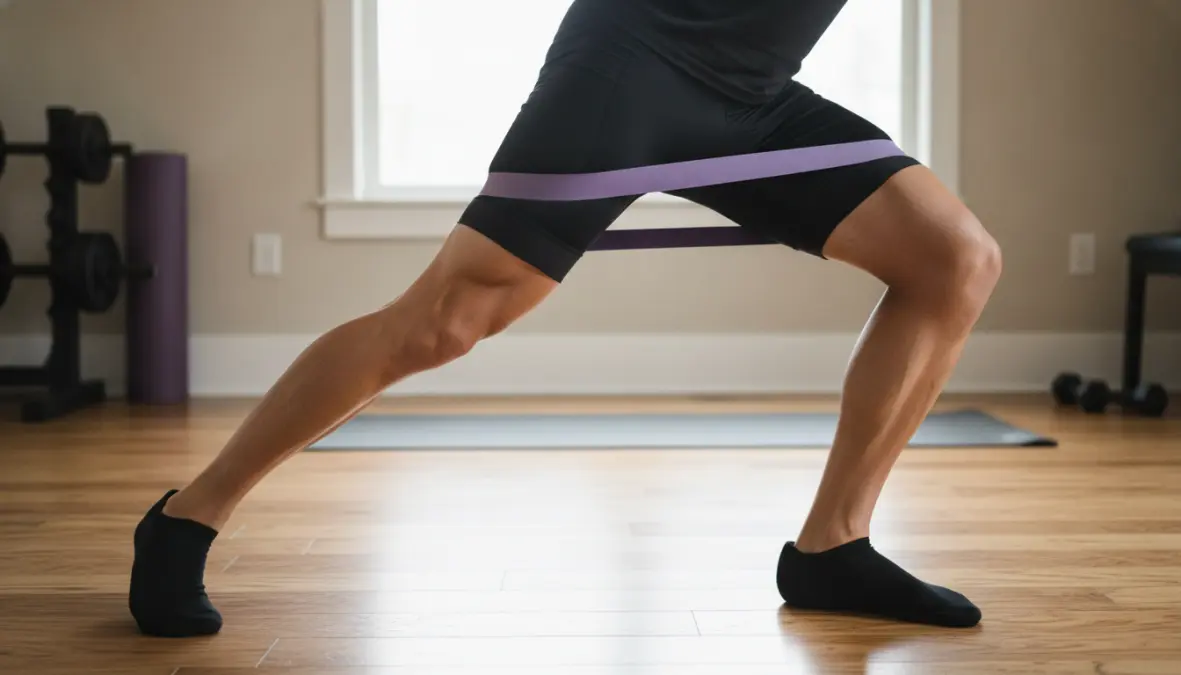
Banded Squats: Loop a medium resistance band around your thighs, just above your knees. Perform standard squats with feet shoulder-width apart, pushing knees outward against the band throughout the movement. This activates glute medius and improves knee tracking—crucial for quadriceps activation and preventing valgus collapse. Aim for 3 sets of 12-15 reps. This exercise directly improves your ability to generate power through the downstroke.
Lateral Band Walks: With the same band placement, take controlled steps sideways in a quarter-squat position. Go 10 steps right, then 10 left—that’s one set. Do 3 sets. This strengthens hip abductors and stabilizers, which control pelvic alignment during the pedal stroke. Weak hip stabilizers are a primary cause of knee issues in cyclists.
Single-Leg Banded Deadlifts: Anchor a band under one foot and hold the other end with both hands. Hinge at the hips while extending the free leg behind you, maintaining a straight line from head to heel. Return to standing. This unilateral exercise addresses strength imbalances and builds the posterior chain essential for powerful climbing. Perform 3 sets of 10 reps per leg. These movements improve muscle endurance in your glutes and hamstrings.
Banded Glute Bridges: Lie on your back with a band around your thighs, feet flat on the ground. Drive through your heels to lift hips, squeezing glutes at the top while pushing knees outward. Hold for 2 seconds. Do 3 sets of 15-20 reps. Strong glutes are essential for generating power, especially when climbing or sprinting—they’re often underactive in cyclists who spend hours in a flexed hip position.
Core Stability and Upper Body Balance
Don’t neglect your upper body—core stability exercises and upper body strength are essential for maintaining proper position, transferring power efficiently, and avoiding the back and neck pain that plague many riders.
Pallof Press (Anti-Rotation Core): Anchor a band at chest height. Stand perpendicular to the anchor point, holding the band with both hands at your chest. Press hands straight out in front of you, resisting the band’s pull to rotate your torso. Hold 5 seconds, return. Do 3 sets of 10 reps per side. This builds the anti-rotational core strength needed to stabilize your pelvis during hard efforts.
Banded Seated Rows: Sit with legs extended, band looped around your feet. Pull band to your lower ribs, squeezing shoulder blades together. This strengthens your upper back and rear delts, improving posture and preventing the rounded-shoulder position that develops from long hours in the drops. Perform 3 sets of 12-15 reps.
Standing Hip Flexor Marches: Loop a band around your feet. March in place, driving knees upward against resistance. This directly strengthens hip flexors—the muscles responsible for the upstroke portion of your pedal cycle that many cyclists neglect. Strong hip flexors improve pedaling smoothness and power through the entire rotation. Do 3 sets of 20 marches (10 per leg).
Banded Clamshells: Lie on your side with band around thighs, knees bent. Keep feet together while opening top knee like a clamshell. This isolates glute medius, essential for hip and knee stability. Perform 3 sets of 15 reps per side. These complement the strength work you’re doing through general strength training for cyclists.
Building Your Cyclist Home Workout Routine with Resistance Bands
Having great exercises is one thing—knowing how to structure a cyclist home workout routine is what actually delivers results. Here’s how to build a sustainable, effective program using bike training resistance bands.
Training frequency: Aim for 2-3 resistance band sessions per week. During base season or off-season, you can push toward 3 sessions. During peak racing season, 2 quality sessions are sufficient to maintain strength gains without interfering with recovery from hard rides. This approach aligns perfectly with proper periodization training for cyclists.
Session duration: Each workout should take 20-30 minutes. That’s it. Efficiency is key—you’re not trying to become a bodybuilder, you’re supplementing your cycling with targeted strength work. A focused 25-minute session is far more valuable than an unfocused hour.
Timing your workouts: The best time for resistance band training to improve cycling power is immediately after easy rides or on dedicated strength days. Never do heavy strength work before an important interval session or race. Your legs need to be fresh for quality bike work. Consider scheduling strength sessions on the same days as your harder rides—this keeps easy days truly easy, maximizing recovery.
Progression strategy: Start with light or medium resistance bands. Focus on perfect form and completing the prescribed reps and sets. When you can comfortably complete all sets with good technique, progress by adding reps (up to 20), adding sets (up to 4), using heavier resistance, or slowing down the tempo. Most cyclists should replace bands with heavier versions every 6-8 weeks as they adapt.
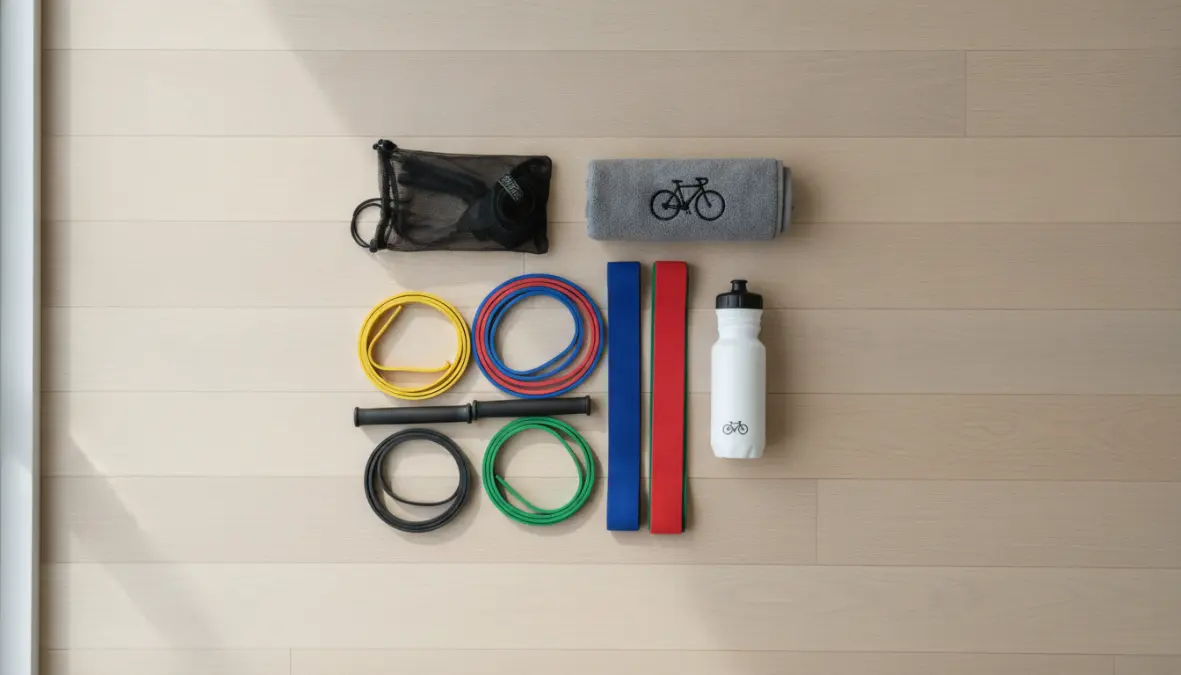
Band selection: Invest in a set with at least three resistance levels. Light bands work for activation and warm-ups, medium for most exercises, and heavy for lower body strength movements as you progress. A complete set costs less than a cycling jersey and lasts for years.
Sample weekly structure (in-season): Monday—Easy ride + 25-min band workout (full body), Tuesday—Intervals, Wednesday—Easy ride, Thursday—Tempo ride + 20-min band workout (lower body focus), Friday—Rest or easy spin, Weekend—Long ride(s). This portable resistance band workout for bike riders approach ensures you’re building strength without compromising your cycling performance.
For cyclists who travel frequently, this routine is ideal. Pack your bands, follow the same structure regardless of location, and maintain consistency. This is particularly valuable during spring training when you’re building your base fitness. The portability factor cannot be overstated—it’s the difference between maintaining your strength work and skipping sessions entirely.
FAQ
How often should cyclists use resistance bands?
Most cyclists benefit from 2-3 resistance band sessions weekly. During off-season or base building, aim for 3 sessions focusing on building strength. During racing season, maintain gains with 2 quality sessions. Always prioritize recovery—if you’re fatigued from hard rides, reduce frequency to 1-2 sessions. Consistency over months matters more than cramming in extra sessions.
Can resistance bands replace weight training for cyclists?
For most recreational and competitive cyclists, absolutely. Bands provide sufficient resistance to build the functional strength and hip flexor strengthening needed for cycling performance. They’re particularly effective for muscle endurance and stability work. However, if you’re specifically working on maximal strength for track sprinting or have access to weights and prefer them, barbells can complement band work. Most riders find bands alone deliver excellent results without the recovery cost of heavy lifting.
What resistance level should cyclists start with?
Begin with light to medium resistance bands. Focus first on mastering movement patterns and completing full sets with proper form. Your ego doesn’t matter here—starting too heavy leads to compensation patterns and poor technique. A medium band challenging you for 12-15 reps is perfect. As you adapt over 4-6 weeks, progress to heavier resistance. Remember, consistent training with appropriate resistance beats sporadic heavy sessions.
When is the best time to do resistance band workouts?
Schedule resistance training immediately after easy rides or on dedicated strength days. Never before hard interval sessions, races, or important rides—your legs need to be fresh for quality cycling work. Many cyclists find success doing strength work right after their easy recovery rides when muscles are warm but not fatigued. Alternatively, dedicate specific days to strength with only easy spinning afterward. This complements your plyometric training schedule effectively.
Do resistance bands help prevent cycling injuries?
Absolutely. Resistance bands strengthen stabilizer muscles—particularly hip abductors, glute medius, and core muscles—that cycling alone doesn’t adequately develop. These muscles control knee tracking, pelvic stability, and proper biomechanics during pedaling. Strengthening them significantly reduces risk of common cycling injuries like IT band syndrome, patellofemoral pain, and lower back issues. Combined with proper mobility training, bands are excellent injury prevention tools.
The beauty of resistance band cyclists training is its simplicity and effectiveness. You don’t need expensive equipment, hours of time, or complicated programs. Just consistent, focused work on the movements that matter most for cycling performance. Whether you’re preparing for your first century, training for competitive racing, or working on climbing power, resistance bands deliver real results. Throw a set in your gear bag, commit to 20 minutes twice a week, and watch your power numbers climb—along with your confidence tackling any terrain the road throws at you.