Foam Rolling Guide: Master Self-Myofascial Release for Faster Muscle Recovery
You know that satisfying feeling when you finally crack your knuckles or stretch out a tight muscle? Foam rolling delivers something even better—but instead of temporary relief, you’re actually helping your muscles recover faster and perform better. Whether you’re dealing with post-workout soreness or chronic muscle tension, this foam rolling guide will walk you through everything you need to know about self myofascial release and how to make it work for your body.
Think of foam rolling as giving yourself a deep tissue massage without the hefty price tag. It’s one of the most effective sports recovery tools you can add to your routine, and once you get the hang of it, you’ll wonder how you ever trained without it.
What Is Foam Rolling and How Does Self-Myofascial Release Work
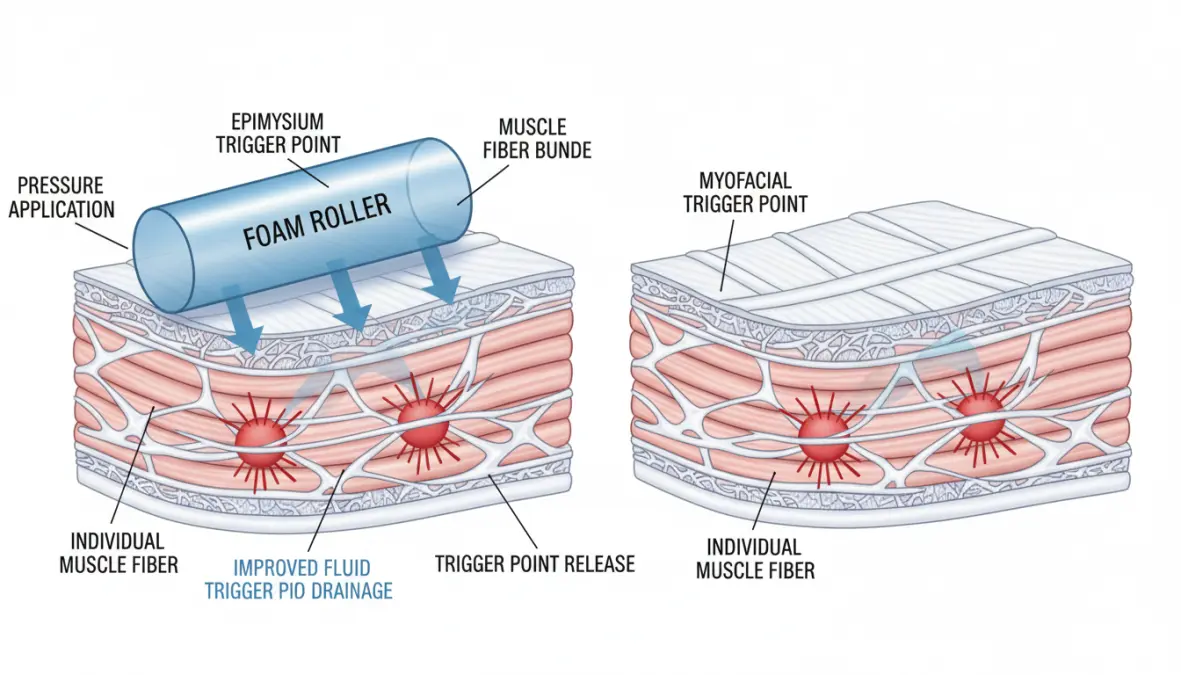
Let’s get into the science without making it boring. Self myofascial release is essentially a technique where you apply pressure to your fascia tissue—the connective tissue that wraps around your muscles like a stretchy spider web. When you exercise, get injured, or even just sit at a desk all day, this fascia can get tight, develop adhesions, and create those annoying muscle knots that feel like tiny rocks under your skin.
When you roll over these tight spots with a foam roller, you’re applying targeted pressure that helps break up these adhesions, increases blood flow, and signals your nervous system to relax the muscle. Research shows that regular myofascial release therapy can improve flexibility by up to 10%, reduce muscle soreness, and enhance overall mobility without decreasing muscle performance.
The foam rolling benefits are pretty impressive: improved range of motion, reduced delayed onset muscle soreness (DOMS), increased blood circulation, and better recovery between training sessions. But here’s where timing matters—foam rolling before or after workout serves different purposes. Pre-workout rolling (5-10 minutes) works as a dynamic warm-up, activating muscles and improving mobility. Post workout recovery rolling (10-15 minutes) helps flush out metabolic waste and reduce soreness. Many athletes do both for maximum benefit.
Unlike static stretching, which can temporarily decrease power output, foam rolling doesn’t impair muscle performance. It’s also more accessible than professional massage therapy and gives you control over pressure and duration. Just like proper recovery nutrition, foam rolling should be a non-negotiable part of your training protocol.
Essential Foam Roller Techniques and Exercises for Every Muscle Group
Now let’s get practical. Understanding how to use a foam roller for beginners starts with mastering three basic foam roller techniques: the slow roll (moving at about 1 inch per second across the muscle), the static hold or trigger point release (pausing on tender spots for 30-60 seconds), and the sweeping motion (longer, faster strokes to flush the area after detailed work).
The golden rule for all foam roller exercises: move slowly, breathe deeply, and never roll directly over bones or joints. You’re targeting the muscle belly, not the connective points. When you hit a tender spot, that’s your cue to pause—not to speed up and escape the discomfort. The sensation should be a “good hurt,” about a 6-7 out of 10 on the pain scale. If you’re grimacing and holding your breath, ease off the pressure.
Here are the key principles for effective muscle recovery techniques:
- Roll each muscle group for 30-90 seconds total
- Spend 20-30 seconds on trigger points
- Maintain steady, controlled breathing throughout
- Start with less dense rollers if you’re new to this
- Roll 3-5 times per week for best results
- Always roll toward your heart to promote circulation
Lower Body Foam Rolling Exercises
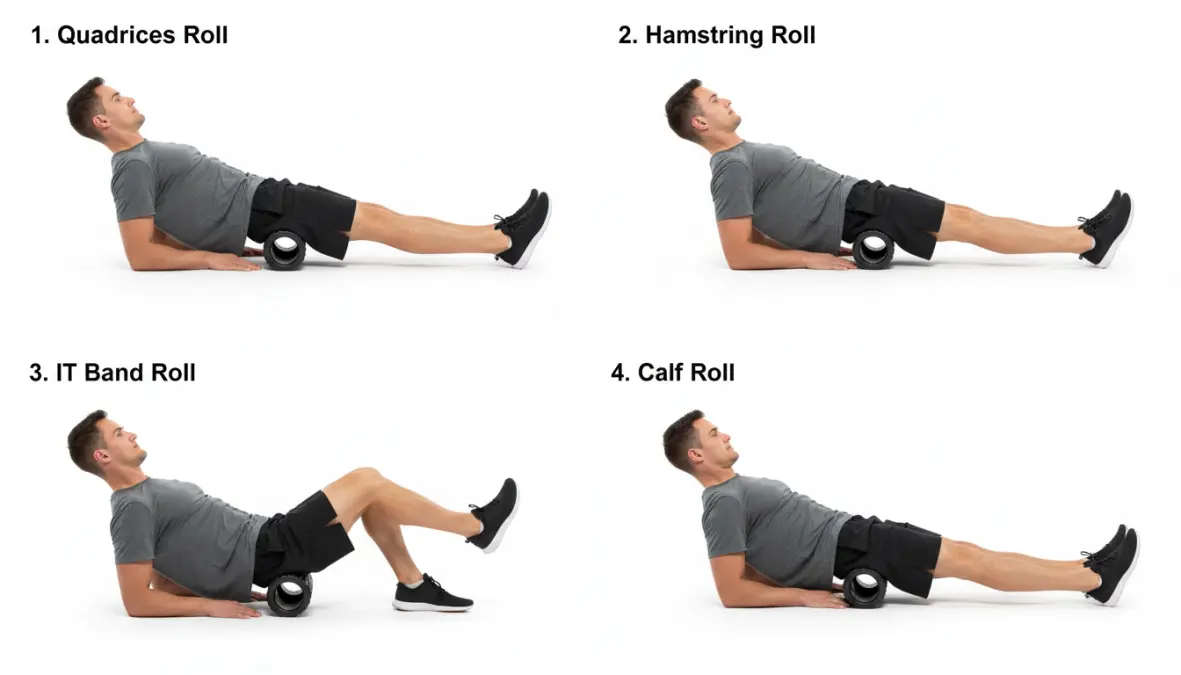
Your legs take the most beating during training, which is why foam rolling for muscle soreness recovery often focuses here. For quadriceps, lie face-down with the roller under your thighs, supporting yourself on your forearms. Roll from just above the knee to the hip crease, spending extra time on any tender areas. This is crucial for runners and cyclists who constantly engage these muscles.
Hamstrings are next: sit with the roller under your thighs, hands supporting you behind. Roll from below your glutes to just above your knees. For extra pressure, cross one leg over the other. The IT band—that notorious troublemaker running down the outside of your thigh—requires a side-lying position. This one’s usually tender, so start light. Many athletes dealing with knee pain find IT band rolling particularly beneficial.
For calves, sit with the roller under your lower legs, hands behind you for support. Roll from ankle to just below the knee. Stack your legs for increased pressure. Don’t forget your glutes and hip flexors—these often harbor hidden tension. For glutes, sit on the roller and cross one ankle over the opposite knee, then roll the working side. Hip flexors require a prone position with the roller at your hip crease.
Spend 30-60 seconds per muscle group, but listen to your body. If you’re training for something intense like triathlon, you might need extra attention on legs.
Upper Body and Back Foam Rolling Techniques
Upper body work is essential, especially if you’re dealing with desk posture or upper-body sports. For your thoracic spine (mid-back), lie with the roller positioned horizontally across your back at shoulder blade level. Cross your arms over your chest and slowly roll up and down. This is one of the best foam rolling exercises for back pain related to poor posture.
Your lats (those big muscles on your sides) respond well to rolling too. Lie on your side with the roller under your armpit area, bottom arm extended overhead. Roll from your armpit to mid-torso. For chest and shoulders, position the roller vertically along your spine and open your arms wide, letting gravity do the work—this is excellent for mobility exercises and counteracting rounded shoulders.
Important warning: Never foam roll your lower back directly. The lumbar spine isn’t designed for this pressure and you risk injury. If you have lower back tension, focus on your glutes, hip flexors, and hamstrings instead—tight legs often cause back compensation.
For those working desk jobs, spend extra time on upper back and shoulders. These areas accumulate tension from hunching over keyboards. The muscle tension relief from regular upper body rolling can dramatically improve your posture and reduce headaches.
Maximizing Your Foam Rolling Routine: Best Practices and Common Mistakes
Let’s talk about the complete guide to foam rolling for athletes—what actually works versus what wastes your time. The question of how long should you foam roll each muscle depends on your goals. For general maintenance, 5-10 minutes daily hits the sweet spot. Pre-competition or after intense training like HIIT sessions, extend that to 15-20 minutes.
Frequency matters more than duration. Rolling for 10 minutes five times per week beats one 50-minute marathon session. Your fascia responds better to consistent, regular stimulus. Ideally, combine foam rolling with flexibility training and dynamic stretching for comprehensive recovery. The sequence? Roll first to release tension, then stretch to lengthen the muscle.
Common mistakes to avoid:
- Rolling too fast: This defeats the purpose. Slow, deliberate movements give your nervous system time to respond
- Avoiding painful areas: Those tender spots need attention most—just don’t overdo pressure
- Rolling joints and bones: Target muscle bellies only; rolling over knees, spine, or other bony areas can cause injury
- Insufficient time on trigger points: You need 20-30 seconds of sustained pressure to create change
- Poor breathing: Holding your breath increases tension; deep breathing enhances the release
- Wrong roller density: Beginners should start softer; advanced athletes can progress to firmer rollers
Choose your foam roller wisely. Smooth, medium-density rollers work great for beginners. As you adapt, textured or vibrating rollers can provide deeper deep tissue massage effects. Keep track of your recovery progress just like you monitor your training with fitness trackers.
Here’s something important: foam rolling isn’t a cure-all. If you’re experiencing sharp pain, swelling, or symptoms that persist beyond typical soreness, consult a healthcare professional. Self myofascial release techniques at home are fantastic for maintenance and recovery, but they don’t replace medical treatment for injuries. Similar to how you need proper mental preparation through mental training, physical recovery requires both self-care and professional guidance when needed.
Foam rolling isn’t glamorous, but it’s one of those small habits that compound into serious performance gains over time. Whether you’re an endurance athlete, strength trainer, or weekend warrior, investing 10 minutes daily in targeted self myofascial release can mean the difference between chronic tightness and feeling mobile and ready to perform. Start with the basics, be consistent, and pay attention to how your body responds. Your muscles—and your future self—will thank you for making this foam rolling guide part of your regular routine. Now grab that roller and get to work!